Check our filters list in last FAQ item “FILTERS SAMPLES”
You can remove one use by simple adding this to functions.php or Snippets plugin:
    add_filter( 'wpblp_qr_code_link_save_hash', function( $value ){
        return 1;
    });
In order to set styles for content inside a pdf file through the admin panel, you can use the code below which needs to be placed in the functions.php file of your theme or placed in a separate plugin.
This code creates a new settings page “QR Code Email Ticket Styles” (found in Settings).
In order to add styles, you need to write them in the text field.
Example: .qrcet_name {color: green ;font-size: 25px; font-weight: bold;}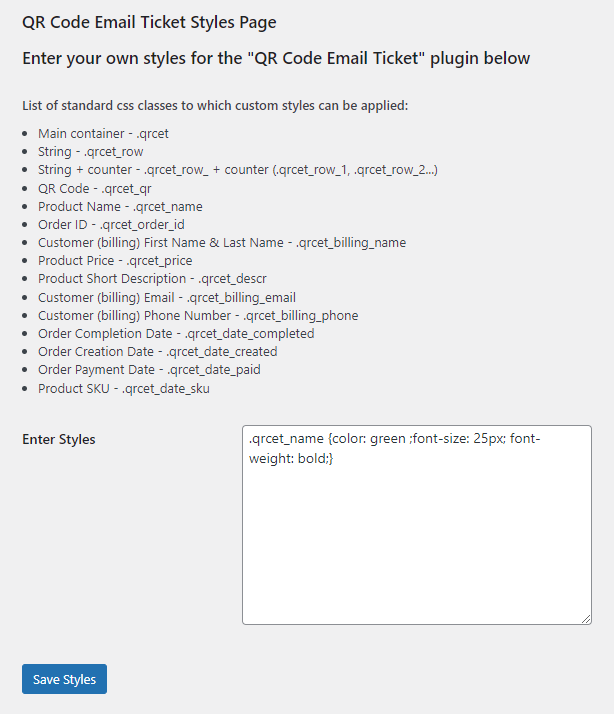
/**
 * Styling content in pdf
 */
// Adding a QR Code Email Styles page to the Settings menu
add_action(‘admin_menu’, ‘add_qr_styles_page’);
function add_qr_styles_page()
{
add_options_page(
‘QR Code Email Styles’, // Page title
‘QR Code Email Styles’, // Menu name
‘manage_options’, // Permissions
‘qr-code-email-styles’, // Unique page identifier
‘qr_styles_page_content’ // Callback to display page content
);
}
// Callback to display page content QR Code Email Styles
function qr_styles_page_content()
{
?>
<style>
.section-title {
margin: 30px 0 10px;
}
.default-class-list {
margin-top: 0;
padding-left: 16px;
}
.default-class-list li {
margin-bottom: 0;
list-style: disc;
}
textarea {
max-width: 350px;
width: 100%;
height: 200px;
}
</style>
<div class=”wrap”>
<form method=”post” action=”options.php”>
<?php
settings_fields(‘qr_styles_group’); // Registering group settings
do_settings_sections(‘qr-code-email-styles’); // Displaying the settings sections
submit_button(‘Save Styles’); // Save settings button
?>
</form>
</div>
<?php
}
// Register the settings and add a text field for styles
add_action(‘admin_init’, ‘register_qr_styles_settings’);
function register_qr_styles_settings()
{
// Registering settings
register_setting(‘qr_styles_group’, ‘qr_styles_option’, ‘validate_qr_styles_option’);
// Adding a settings section
add_settings_section(
‘qr_styles_section’,
‘QR Code Email Ticket Styles Page’,
‘qr_styles_section_callback’,
‘qr-code-email-styles’
);
// Adding a field for entering styles
add_settings_field(
‘qr_styles_field’,
‘Enter Styles’,
‘qr_styles_field_callback’,
‘qr-code-email-styles’,
‘qr_styles_section’
);
}
// Callback to display the settings section
function qr_styles_section_callback()
{
?>
<h3>Enter your own styles for the “QR Code Email Ticket” plugin below</h3>
<div>
<h4 class=”section-title”>List of standard css classes to which custom styles can be applied:</h4>
<ul class=”default-class-list”>
<li>Main container – .qrcet</li>
<li>String – .qrcet_row</li>
<li>String + counter – .qrcet_row_ + counter (.qrcet_row_1, .qrcet_row_2…)</li>
<li>QR Code – .qrcet_qr</li>
<li>Product Name – .qrcet_name</li>
<li>Order ID – .qrcet_order_id</li>
<li>Customer (billing) First Name & Last Name – .qrcet_billing_name</li>
<li>Product Price – .qrcet_price</li>
<li>Product Short Description – .qrcet_descr</li>
<li>Customer (billing) Email – .qrcet_billing_email</li>
<li>Customer (billing) Phone Number – .qrcet_billing_phone</li>
<li>Order Completion Date – .qrcet_date_completed</li>
<li>Order Creation Date – .qrcet_date_created</li>
<li>Order Payment Date – .qrcet_date_paid</li>
<li>Product SKU – .qrcet_date_sku</li>
</ul>
</div>
<?php
}
// Callback to display the style input field
function qr_styles_field_callback()
{
$value = get_option(‘qr_styles_option’);
echo ‘<textarea id=”qr_styles_field” name=”qr_styles_option”>’ . esc_textarea($value) . ‘</textarea>’;
}
// Validation of entered styles
function validate_qr_styles_option($input)
{
// Removing extra spaces and line breaks
return trim($input);
}
// Add Custom CSS (the qrcet_email_css filter from the “QR Code Email Ticket” plugin is used)
add_filter(‘qrcet_email_css’, function ($css) {
// Getting style values from settings
$custom_styles = get_option(‘qr_styles_option’);
// Checking that style values exist and are not empty
if (!empty($custom_styles)) {
// Adding custom styles to the $css variable
$css .= $custom_styles;
}
return $css;
}, 10, 1);
Styles are applied by using the qrcet_email_css filter described in the question “QR Ticket FILTERS SAMPLES (Premium)?”.
In order to change the name of a pdf file, you need to make changes directly to the plugin code.
To do this, open the file “qr-code-email-ticket/inc/functions.php”. In it, find the line “$filename = $id . ‘.pdf’;”. If the line is changed to “$filename = ‘WooLabel (‘ . $id . ‘).pdf’;” then the file will have a name something like “WooLabel (453-12-2).pdf”.
Important! You need to be careful about changing the file name as this may cause errors in the operation of the site.
If you copied the code from the FAQ page, pasted it onto your website and then get a critical error, then most likely the problem is in the quotes.
You will need to replace the quotes with similar single/double quotes and the code will work.
It is best to do this in the code editor, as it will be visible there if some quotes are not replaced.
Regular Licence is for installation and plugin use on one website. Plugin updates are provided with an active subscription. Extended Licence is for Website companies/Developers that may install it on more than one of their clients websites.
- Deactivate and delete free version
- Download premium version from WooLabel.com or CodeCanyon Downloads tab
- Upload and activate premium plugin version
- Go to the new menu item – Woolabel -> Settings and setup according to your label size and press Save
- Enjoy Woolabel premium version
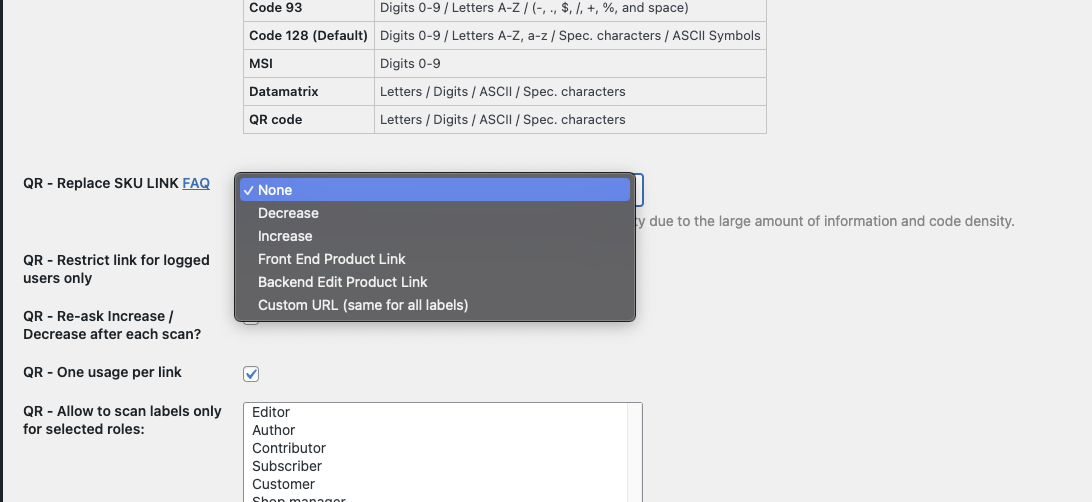
- Change select “QR – Replace SKU LINK“. Also, set QR code barcode type, and adjust width and height according to label size. – Increase – Increase Stock after the scan. – Decrease – Decrease Stock after the scan. – Front End Product Link – Link to the product page, which can be used by anyone without login access – Backend Edit Product Link – Link to the Edit Product Page, you need to be logged in as admin on the device to use it. – Custom Link – Can be used to set global website link, etcNOTE: QTY will be decreased/increase only for products with enabled “Manage Stock”.
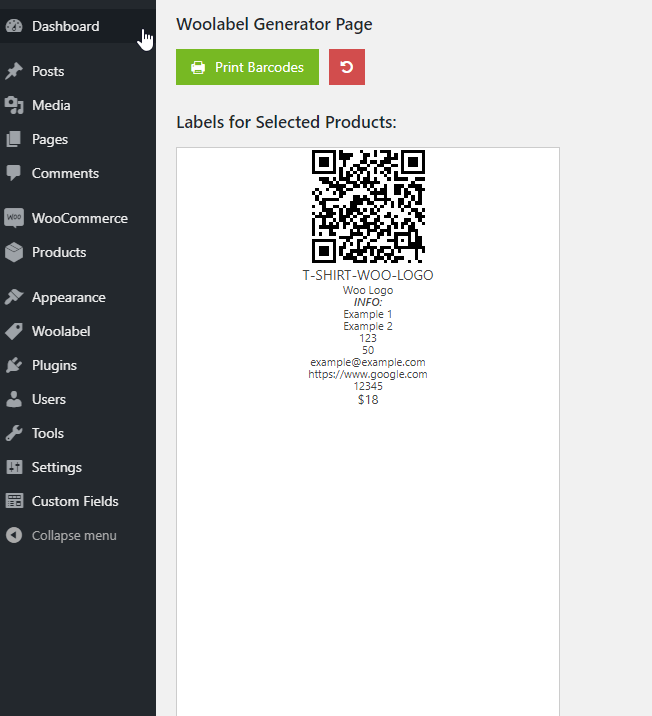
- Print labels and stick it to products.
- Scan barcode via app on mobile phone, we recommend this one APP for Android , and open link
- You will be redirected to your website, and will see the result
- Go to Woolabel -> Settings and check checkbox SKU Add-on Text, then click Save
- With this you can add custom text to each product, go to Products -> Edit (product)
- Locate Product data tabs, “Inventory” Tab and type custom text for this edited product
- Go to main Woolabel page and print this product label

Set checkbox “Replace SKU with decrease QTY link?”. Also, set QR code barcode type, and adjust width and height according to label size.
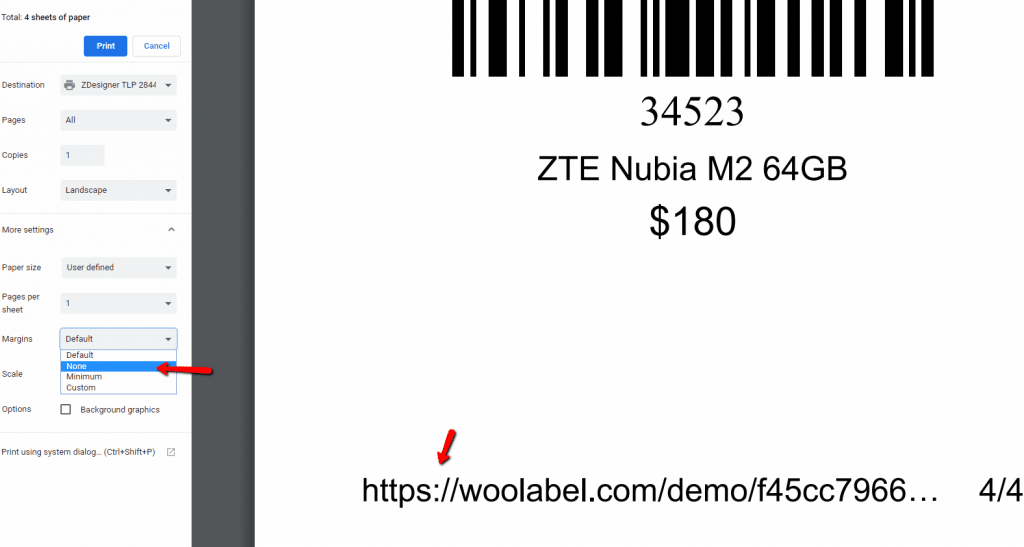
So as the result will be displayed on the screen in pixels, and they aren’t metric units in the real world and they depend on the dpi / ppi then perhaps you will need to adjust these settings after printing
- On Print Page you need set Margins to None
- Close the window with Cancel, and press Print again
It’s because by default WooLabel using ‘manage_options’ permissions for all selected user roles in settings, maybe selected role doesn’t have this capability.
You can easily change this by using filter: wpblp_users_caps.
Sample can be found in “FILTERS SAMPLES (Premium)?” FAQ Item
You can check more information about roles capabilities by this links:
Actual changelog is always included in the plugin documentation. You can found it in the plugin archive.
add_filter('wpblp_set_custom_label_fields', function($html, $id){
    $product    = wc_get_product($id);
    $html        = '';

    if( $product->is_on_sale() ) {
        $price                         = $product->get_regular_price();
        $setting_bar_currency        = wpblp_get_single_setting( 'wpblp_settings_input_field_price_currency' );
        $setting_bar_currency_pos     = wpblp_get_single_setting( 'wpblp_settings_select_price_currency_pos' );
        $html                         .= '<div class="wpblp_price_regular">';

        if ( $setting_bar_currency_pos != 'after' ) {
            $html .= esc_html( $setting_bar_currency );
        }
        $html .= esc_html( number_format( $price, wc_get_price_decimals(), wc_get_price_decimal_separator(), wc_get_price_thousand_separator() ) );
        if ( $setting_bar_currency_pos == 'after' ) {
            $html .= esc_html( $setting_bar_currency );
        }
        $html .= '</div>';
    }
    return $html;
}, 10, 2);You can use:
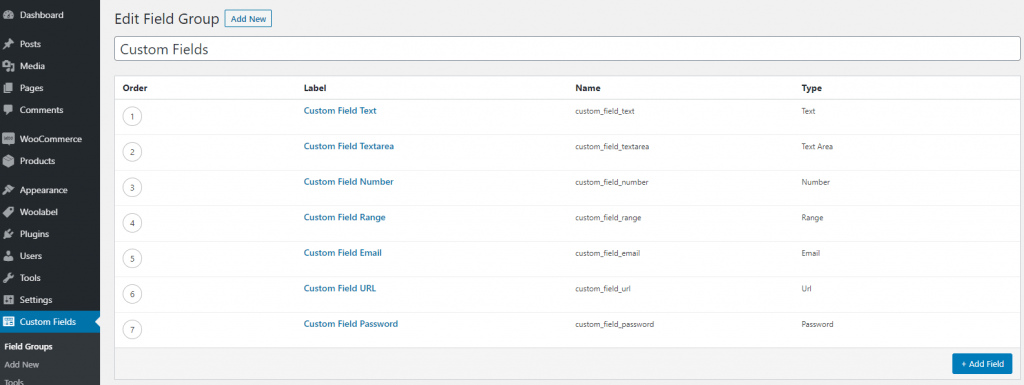
- ACF Plugin fields, you can use it like: [wpblp_acf name=custom_field_text], where “custom_field_text” is field ID, and only for these field types:
- Text
- Text Area
- Number
- Range
- URL
- Password
- Custom Shortcode [your-shortcode product_id=%wpblp_id] and %wpblp_id will be auto-replaced with product simple/variation ID
- HTML tags
- Text
How to use:
- Create ACF Plugin Fields and fill it

2. Add it to Settings
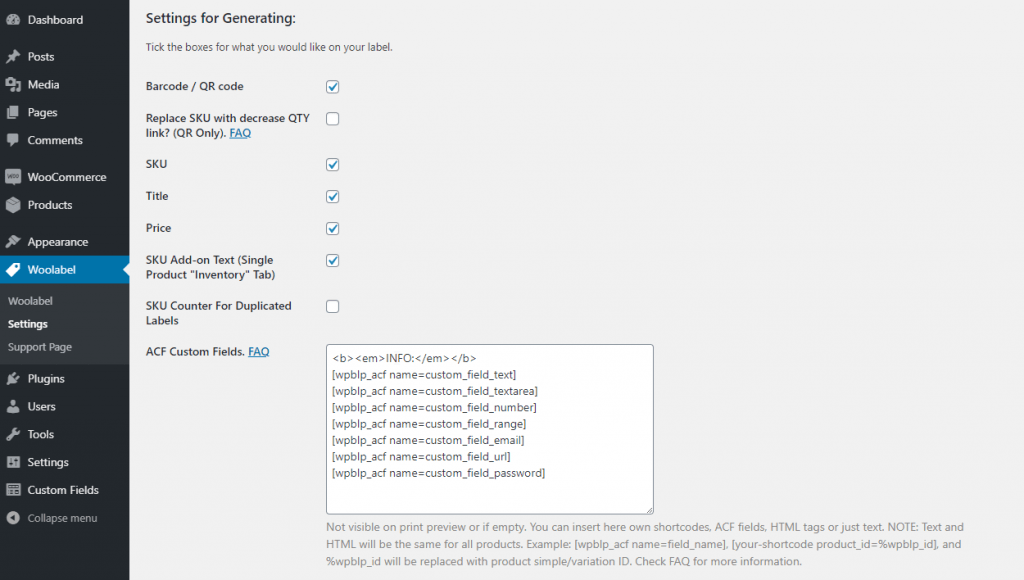
3. Print
In order to display the number of products, you can add the following code to the theme’s functions.php file (the code may need additional modifications depending on your theme), also in the plugin settings you need to insert the shortcode [show_id id=%wpblp_id] into the “ACF Custom Fields” text field:
function custom_show_id_shortcode($atts)
{
    // Extracting shortcode attributes
    $atts = shortcode_atts(array(
        'id' => '0', // Default value if no ID provided
    ), $atts, 'show_id');

    // Getting a product object
    $product = wc_get_product($atts['id']);

    if (!$product) {
        return 'Product not found.'; // Product not found.
    }

    // Check if the product is a variable
    if ($product->is_type('variable')) {
        $stock_quantity = $product->get_stock_quantity(); // We receive the quantity in stock for the variation
        $stock_quantity_text = is_null($stock_quantity) ? 'Quantity in stock not specified for this variation' : 'Quantity in stock: ' . $stock_quantity;
    } else {
        // For simple products or other types
        $stock_quantity = $product->get_stock_quantity(); // We receive the quantity in stock
        $stock_quantity_text = is_null($stock_quantity) ? 'Quantity in stock not specified' : 'Quantity in stock: ' . $stock_quantity;
    }

    // Forming and returning a string for output
    return "<div>{$stock_quantity_text}</div>";
}

// Shortcode registration [show_id id=%wpblp_id]
add_shortcode('show_id', 'custom_show_id_shortcode');

In order to add a print label button to a product on the edit order page, you can use two methods:
1) Add the code to the file \wp-content\plugins\woocommerce\includes\admin\meta-boxes\views\html-order-item.php around line 46-47 after <?php do_action( ‘woocommerce_after_order_itemmeta’, $item_id , $item, $product ); ?>.
$id = '';
if ($item->get_variation_id()) {
    $id = $item->get_variation_id();
} else {
    $id = $item->get_product_id();

}

$link = add_query_arg(
    [
        'post_type' => 'product',
        'page' => 'wpblp_generator_page',
        'gen_products' => $id,
    ],
    admin_url('edit.php')
);

$link = wp_nonce_url($link, 'woo-product-barcode-label-printing-gen-products');
$link = str_replace('&', '&', $link);
$link = str_replace('%2C', ',', $link);

echo '<p><a target="_blank" class="wpblp_button button tips wpblp_print_product" data-tip="' . esc_attr__('Woolabel Print Label', WooLabel_Premium::$textdomain) . '" href="' . esc_url($link) . '">' . esc_html__('Woolabel Print Label', WooLabel_Premium::$textdomain) . '</a></p>';
2) Add the code to the theme’s functions.php (IMPORTANT!!! Perhaps in your specific case the code will need to be slightly modified).
function custom_content_after_order_itemmeta($item_id, $item, $product)
{
    $id = '';

    if (is_a($item, 'WC_Order_Item_Product')) {
        $product_id = $item->get_product_id();
        $variation_id = $item->get_variation_id();
        $id = $product_id;

        // Checking if there is a variation ID
        if (!empty($variation_id)) {
            $id = $variation_id;
        }
    }

    $link = add_query_arg(
        [
            'post_type' => 'product',
            'page' => 'wpblp_generator_page',
            'gen_products' => $id,
        ],
        admin_url('edit.php')
    );

    $link = wp_nonce_url($link, 'woo-product-barcode-label-printing-gen-products');
    $link = str_replace('&', '&', $link);
    $link = str_replace('%2C', ',', $link);

    echo '<p><a target="_blank" class="wpblp_button button tips wpblp_print_product" data-tip="' . esc_attr__('Woolabel Print Label', WooLabel_Premium::$textdomain) . '" href="' . esc_url($link) . '">' . esc_html__('Woolabel Print Label', WooLabel_Premium::$textdomain) . '</a></p>';

}

add_action('woocommerce_after_order_itemmeta', 'custom_content_after_order_itemmeta', 10, 3);